Contents
- Contents
- Introduction
- Browser plugins
- Linters
- Unit testing
- Site-wide journey testing
- Automated tests as a metric
- The misconception about automated tests
- Enhancing automated tests
- Automating screen-readers
- Incorporating automated testing into a workflow
- Wrap up
Introduction
Automated testing can be a valuable tool when it comes to testing for accessibility. The flexbility means they can be included in an existing workflow without too much disruption. By making considered adjustments to existing tests we can improve outcomes and provide greater assurance.
Browser plugins
The first introduction most people have to automated accessibility tests is one of the many accessibility plugins for browsers.
This list is not exhaustive, but these are the most well-known ones with single-click checks:
- axe - one of the most popular accessibility plugins, its axe-core ruleset forms the basis of some others such as Lighthouse. Axe-core also lends itself well to command-line testing as we will see.
- Wave - another well-known and possibly more starter-friendly than axe as it overlays the page with icons indicating where issues lie
- ARC Toolkit - fast and effective, but its simplicity might suit more experienced users - has a good range of manual testing helpers
- IBM Equal Access Accessibility Checker - similar to axe this also adds some other options for viewing results, such as grouped by element or violation. This is also available as a node package for command-line usage.
- Accessibility Insights for Web - primarily a guided test suite but does have a single-click test option - has a good tab stop visualiser
Some of these may have additional tools (often called “guided tests”), but these are normally used in manual testing. Here we are just looking at the part of the plugin where a suite of tests are run against a page with no input from the user.
Report output
These plugins all run on a single page and will generate a report detailing the failure, perhaps with a snippet of the offending code and suggestions for how to fix it.
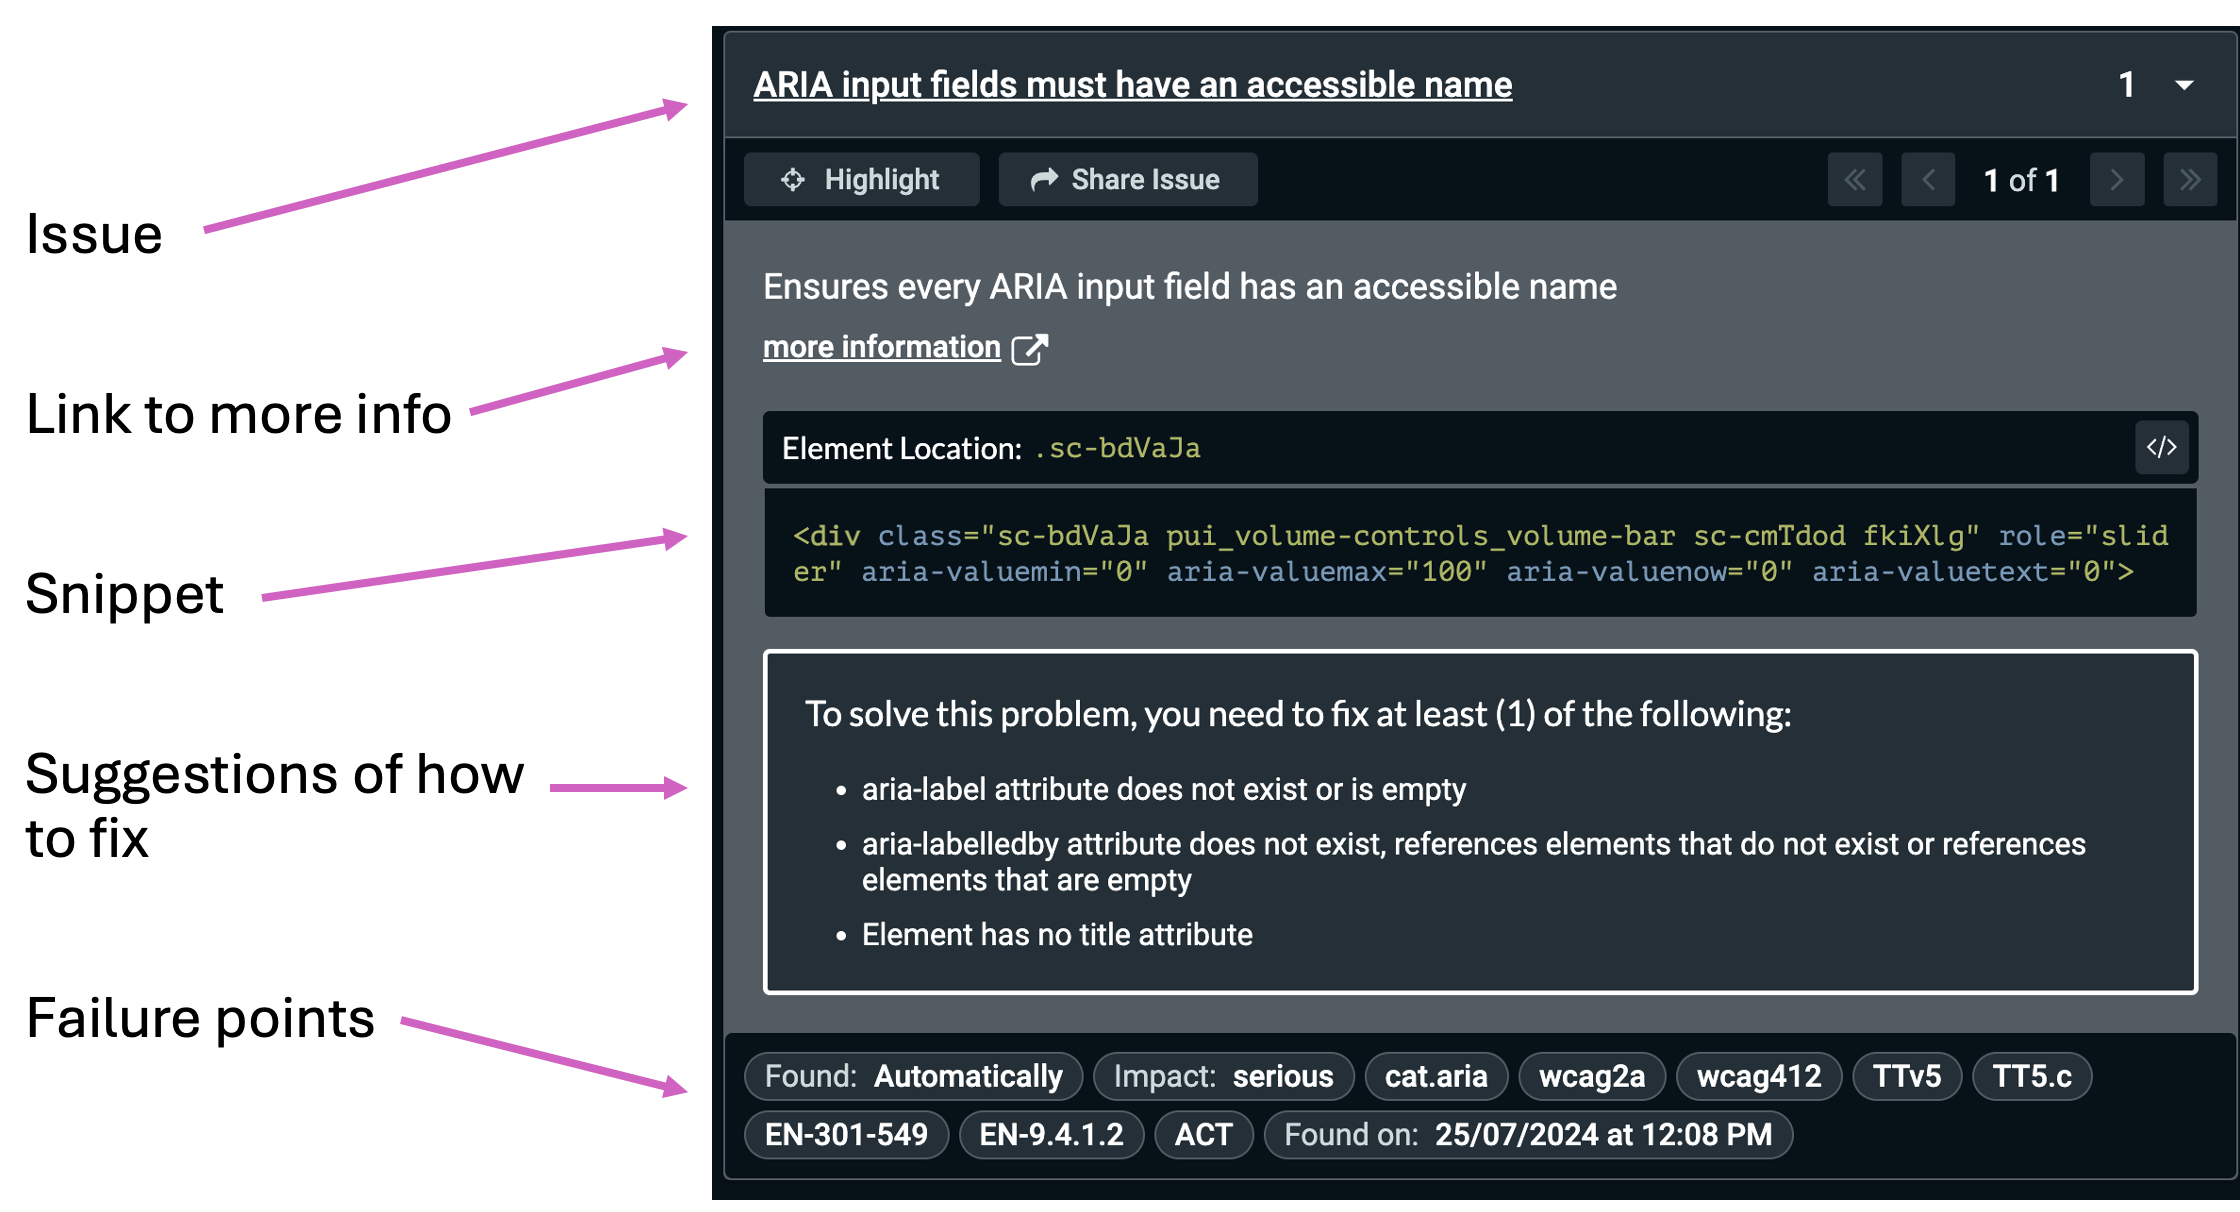
There are differences in what each one reports as they are built on their own set of checks - especially when it comes to colour contrast. For this reason it can be helpful to use two different plugins to check the same subject.
Are plugins useful?
These plugins are all very easy to use, they are literally a push-button approach and are very visual. They generally also do a good job of highlighting the issue and providing additional information. As such they can be a good way to learn more about accessibility, especially WCAG.
Their simplicity is also part of the problem. They will only test the page in its current state and at the current viewport. Any interactions or parts of the page only exposed by interactions will not be tested.
They also only test for a small group of issues, primarily ones based on syntax use. Whilst this can be very valuable (as some of these can be difficult to spot otherwise), it does leave a lot of potential issues untested.
For example a plugin could tell you that a heading level has been skipped, but it cannot tell if the correct heading levels are being used to correctly relay content relationships.
Finally, as most plugins utilise their own set of custom rules, there can be variations in reporting.
These one-click reports are effectively linting the interface to find syntax issues (in fact as we'll see the same code is used in some linters). Just as you would not rely purely on a linter to check your application code we should not rely on accessibility linters to check for accessibility. We should always supplement these with additional manual checks.
Closer examination of most plugins will show that these one-click reports are only part of what they offer. Most will also have a suite of additional tools which assist with manual testing such as keyboard tab order.
Linters
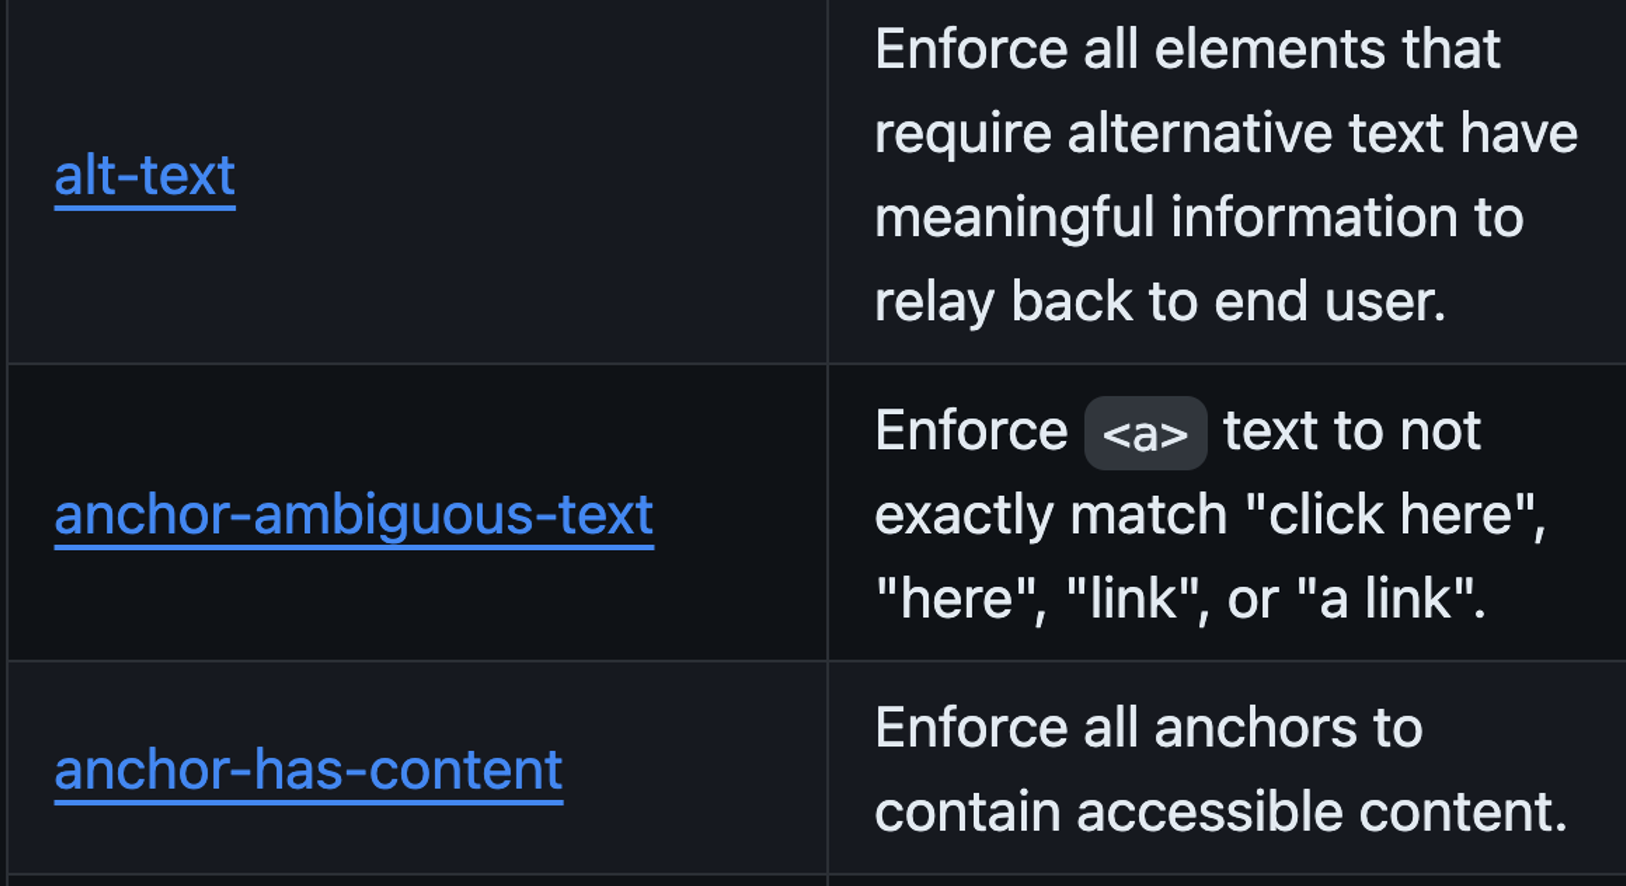
What is better than running some code in the browser only to find issues with a plugin? Finding those issues as you code. This is where linters come in. Some have their own set of rules (such as eslint-plugin-jsx-a11y) whilst others leverage existing libraries such as axe-core.
These do have some limitations on what they can test - for example colour checks are often exempted - and depending on how your components are constructed they may have difficulties in making necessary associations.
Unit testing
We can run command-line compatible rulesets (like axe-core or IBM) against individual components.
// using Jest with axe-core

test("component passes automated accessibility checks", async () => {
    const render = () => `
        <label>Name</label>
        <input type="text" id="name" name="name">
        `;
    const html = render();
    // run the checker against our component
    // assert that we don't get any violations back
    expect(await axe(html)).toHaveNoViolations();
});
This opens up the possibility for additional scripting, such as providing optional data or performing interaction before running the accessibility check.
Site-wide journey testing
There are options to be able to run similar checks to the ones from browser plugins across multiple pages or entire sites. As mentioned most common is axe-core which is the rules engine which the axe browser plugin uses, but others such as Pa11y are available.
These can be set to run as part of a continuous integration build step to provide some confidence in development.
// using Playwright with axe-core

test("Pass automated tests", async ({ page }) => {
    await page.goto("http://www.example.com", {
        waitUntil: "domcontentloaded",
    });
    // run the checker on the page
    const a11yScan = await new AxeBuilder({page}).analyze();
    // assert that we don't get any violations back
    expect(a11yScan.violations).toEqual([]);
});
The results are rendered in the console but there is the potential to generate html reports. A similar level of detail to that provided by the browser plugins can be generated as the data is broadly the same.

Whilst more involved than the browser plugin version to set-up, this is still a relatively simple implementation. As long as it is set up to run site-wide then it also provides a useful baseline asurance that any changes to one page or component have not had unwanted effects elsewhere.
With a little thought, interactions could be triggered in scripts prior to running the checks to provide more in-depth coverage.
However, as with the browser plugins these checks will still only ever find a subset of the issues. As with any automated checks, these are also only truly effective if they are reguarly monitored. Unless a failing test also fails the build or features in a strong definition of done, it is common for these tests to be set up and forgotten about.
Automated tests as a metric
One of the most useful things about running automated tests as part of the pipeline is that they provide a measurable metric.
The easily-repeatable nature means they function well as a gauge for progress, especially with a remediation project where retrospective fixes are being addressed.
The misconception about automated tests
There is something of a misconception that if automated tests are run against a site, page or component and a pass is signalled, that this means the item is accessible. This is not the case.
A clear pass only means that the automated checks did not find any failures against the limited set of rules it tests against.
It is not telling you everything is ok.
It is very possible for the subject to pass automated tests whilst still failing the user and being inaccessible. This is why we still need to build manual testing into our test strategies.
With that said, automated tests form an important part of our toolkit and are a useful baseline and warning against potential regression.
Read more about testing strategies and accessibility
Enhancing automated tests
So we know that library-style accessibility checkers are good for capturing some issues, but what are the gaps we need to think about filling when we are adding custom scripts to our tests?
Some areas to consider are:
- Semantic structures
- Keyboard access
- Reflow
- Interaction and state
Enforcing semantic structures
Semantics are essential for good accessibility as they form the basis of good screen-reader experiences. However they can often be missed as their lack of presence can be masked by visual styles.

But we can improve this as part of our tests without often having to generate specific tests by making our selectors do the hard work.
Instead of using ID attributes to locate elements we can look for accessible hooks to assert-as-we-go. These can include element roles, accessible names or state information such as aria-expanded.
// using Playwright
// get button with accessible name of "login" and aria-expanded=false
await page.getByRole('button', {name: "login", expanded: false});
// using Playwright
// get h2 with accessible name of "conditions"
await page.getByRole('heading', {level: 2, name: "Conditions"});
This type of declarative test makes this a really good fit for TDD (test-driven development) as it enforces good accessiblity practice before any code has been written.
Enforcing good keyboard accessibility
It can be all too easy to test a component as we might access it ourselves and not think about other ways it might need to be accessed. For example keyboard access tends to get ignored as most developers use mouse-based navigation. But making sure our components are actionable with just a keyboard is an essential part of accessibility practice.
Ignoring keyboard accessibility is all too common and is easy to see the evidence when looking at various commerical websites.
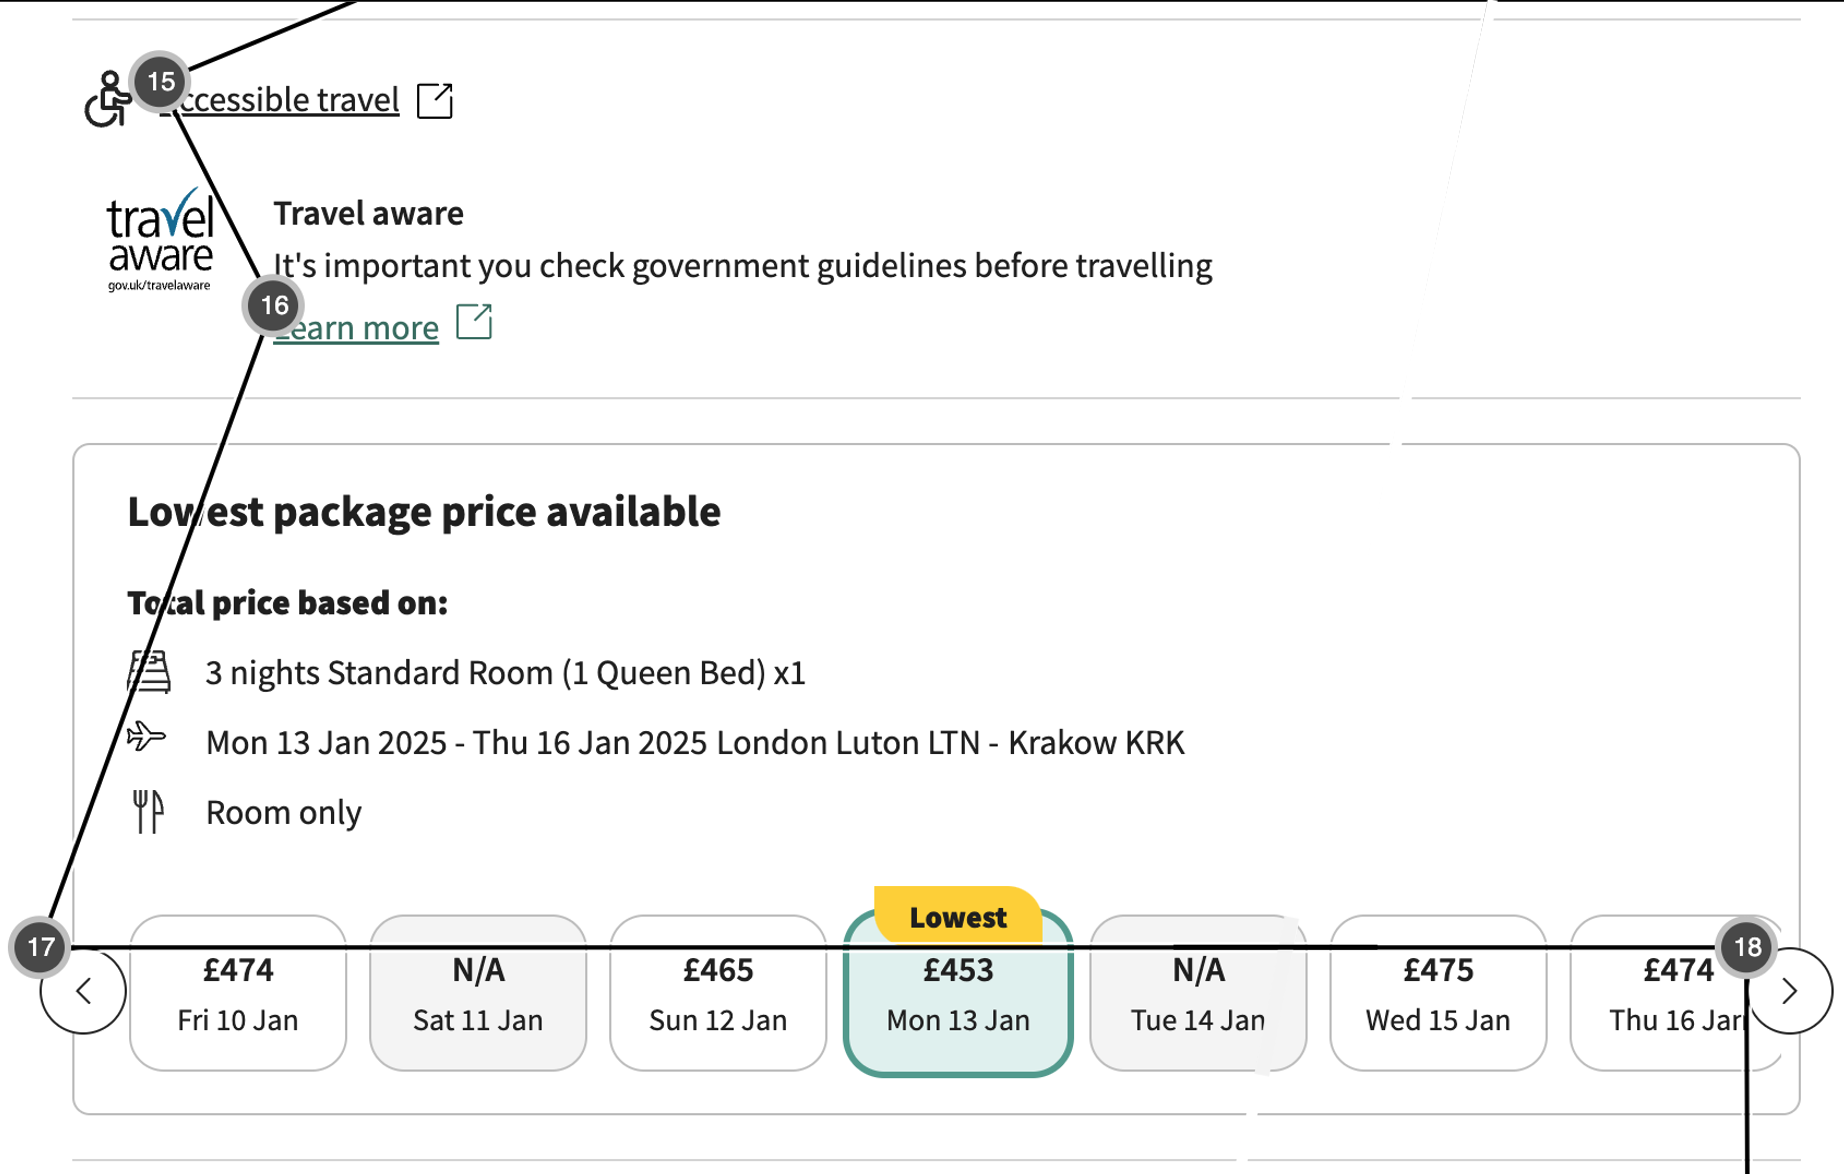
Most of the action and locator events in test scripts act as mouse users - for example moving directly to a control and clicking it. This will not provide us with any assurance that a keyboard-only user can access the same item.
We need to write tests to check that the keyboard user:
- can access the control
- accesses the control in a logical order (for example the previous focusable element was the one expected)
- can action the control
Let's write an example test for the above situation.
// using Playwright

test('user can access carousel items', async ({ page }) => {
    // use accessible selectors to get the left-hand carousel button
    const carouselPrev = page.getByRole('button', {name: 'previous'});

    // grab the first carousel item
    // using an ID as the content is dynamic (we could improve this)
    const firstDeal = page.getByTestId('first-deal-item');

    // focus on the carousel button
    carouselPrev.focus();

    // use the tab key to move
    await page.keyboard.press('Tab');

    // assert that the first carousel item has gained focus
    await expect(firstDeal).toBeFocused();

    // activate the carousel item using a key command
    await page.keyboard.press('Enter');

    //then we can assert that the page has updated as normal
    ...
});
Whilst this might not be something which you would probably want to do for normal content, it would be beneficial for any complex components or ones which involve interaction. It is here where mouse event listeners are most often employed at the expense of keyboard users.
Reflow
Reflow is not something which it is easy to generate TDD scripts for, but it is something which can have regression tests written to prevent issues appearing.
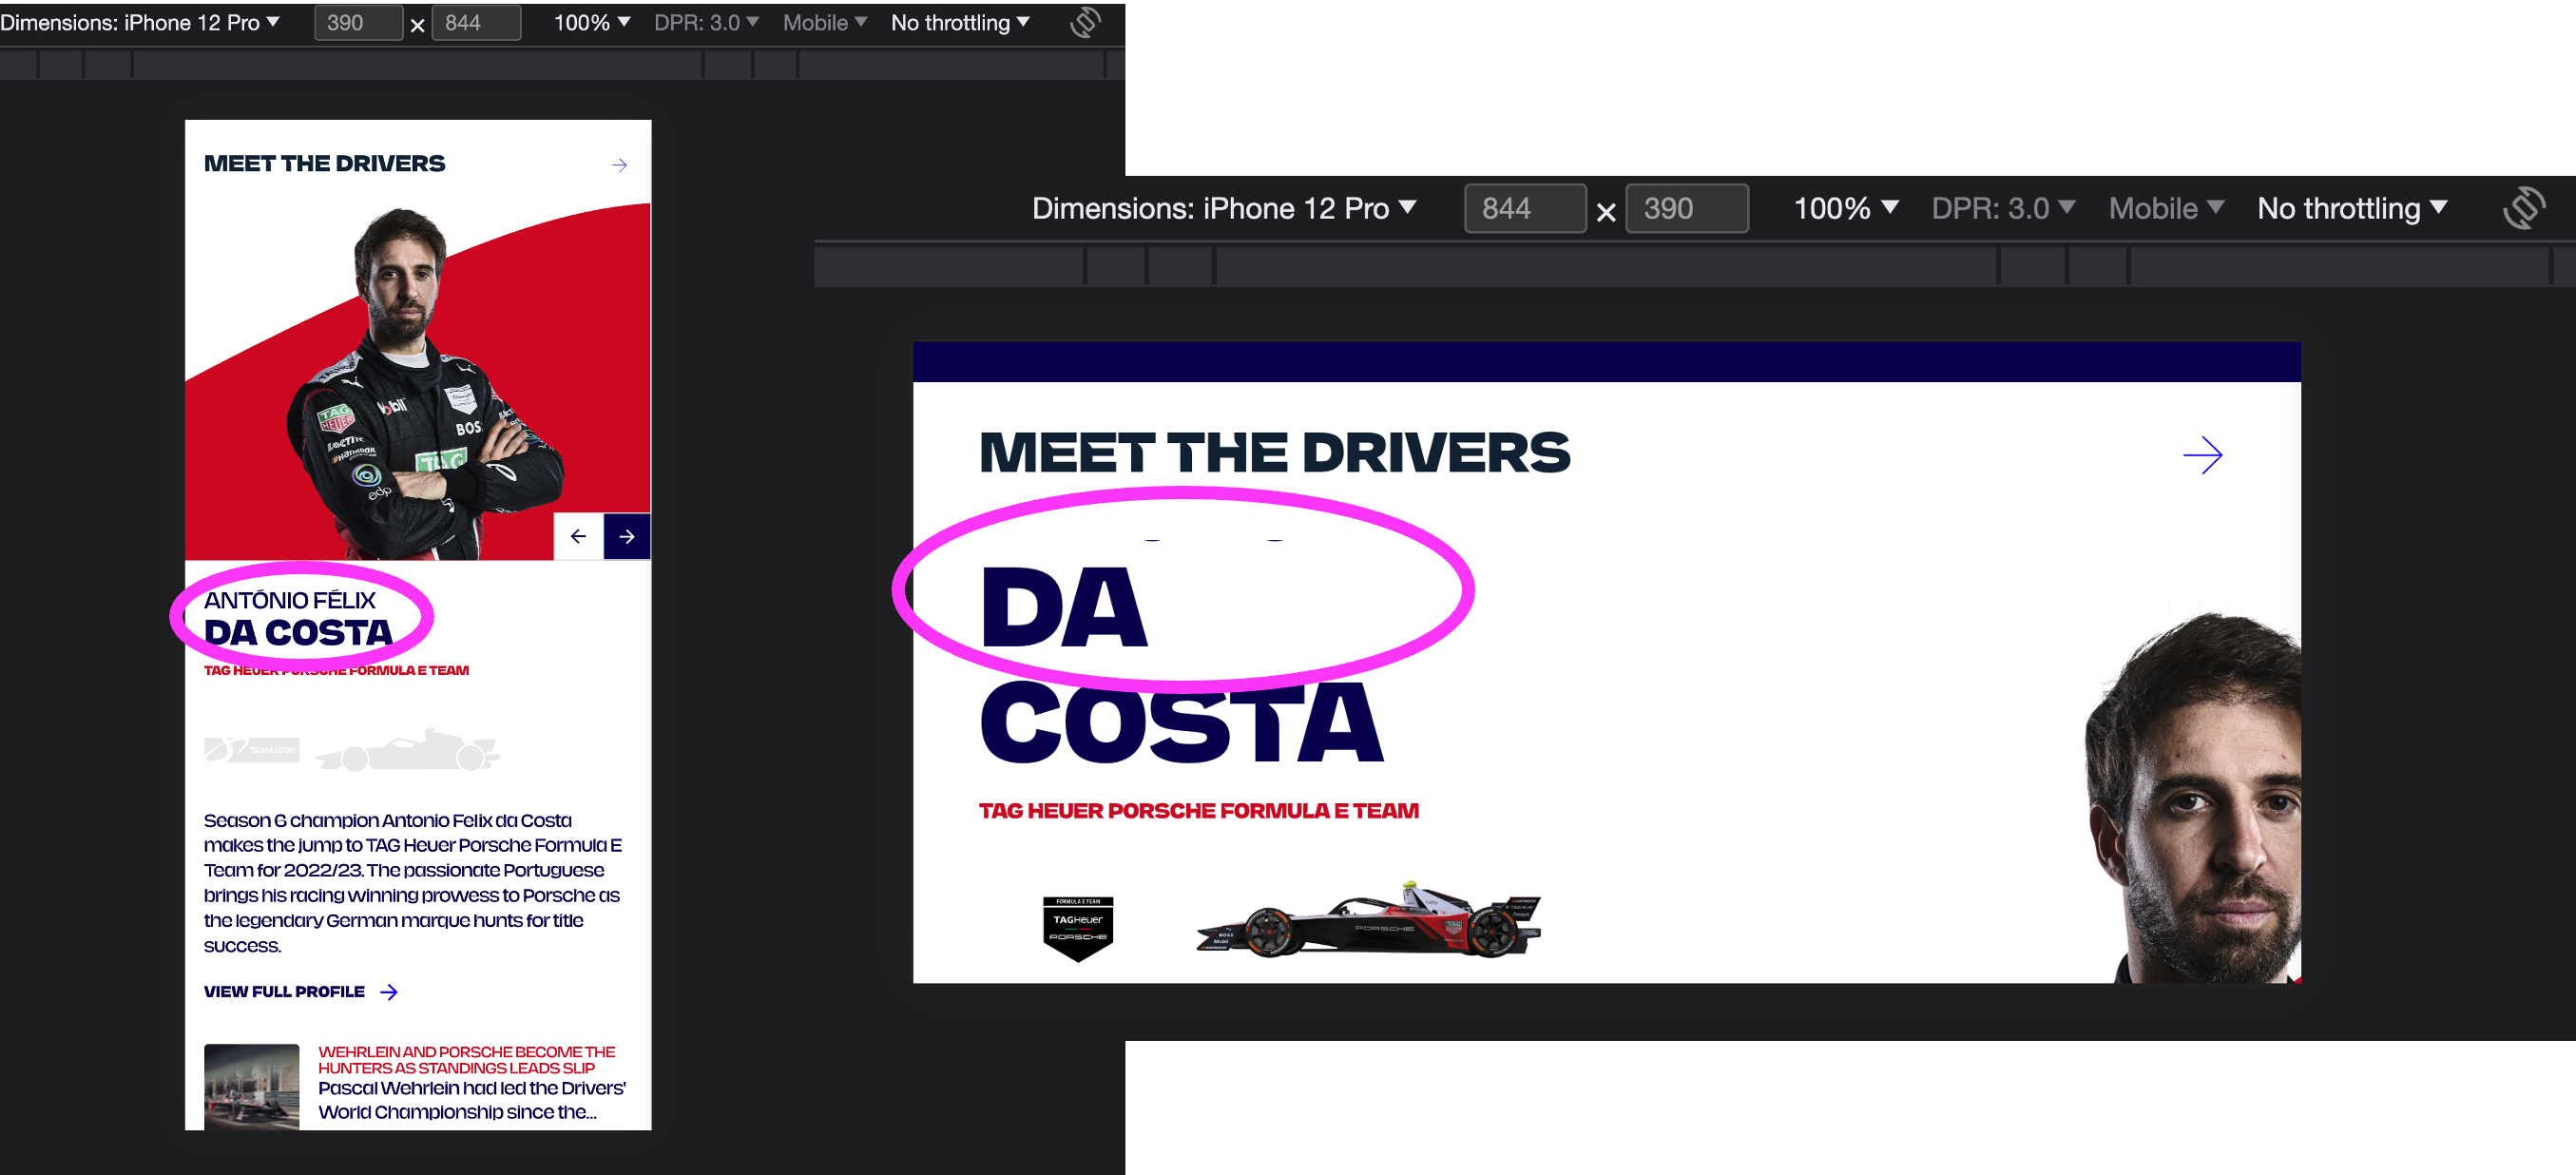
Reflow issues often occur when the content overflows either the viewport or its parent container. This can be due to:
- text size increases by the user which haven't been handled
- viewport size changes, such as moving from dektop to mobile
- changing viewport orientation, such as mobile being viewed in landscape rather than portrait mode
In these situations content can either sit off-screen (albeit sometimes readable by scrolling the screen) or can be cut off so it is entirely unreadable.
Reflow really needs to be manually tested as some of the triggers are not available to scripts (such as text-size or spacing increase), but we can add some automated tests to help us catch some regressions once we have a well-tested base.
By using visual regression testing we can take screenshots of each page at different viewport sizes. Then when making updates new screenshots are taken and compared to the 'good' originals. This could help isolate any overflow issues.
// Using Cypress
const baseUrl = "https://liptrot.org";
// determine screen sizes to test
const sizes = [[390, 844], [1024, 1366], [1024, 600]]
// list of pages to run against
const pages = [
  {url:"/",name:"home"},
  {url: "/guides", name:"guides"},
  {url: "/posts/accessible-names/", name:"blog-accessible-names"}
]
// loop through each page and size and take a screenshot
sizes.forEach((size) => {
  describe(`On ${size} screen`, () => {
    pages.forEach((page) => {
      it(`Render ${page.name}`, () => {
        if (Cypress._.isArray(size)) {
          cy.viewport(size[0], size[1])
        } else {
          cy.viewport(size)
        }
        cy.visit(siteUrl + page.url)
        // compare the new screenshot against the one held as the 'good' version
        cy.compareSnapshot(`${page.name}-${size}`)
      })
    })
  })
})
State tests
As we have already seen we can use thoughtful locator queries to assist in enforcing good accessible markup and these included using state information such as aria-expanded.
As these state attributes form the basis of important announcements to screen-readers, we should also check that they are being updated correctly.
We want to be particuarly mindful of attributes or content which get updated as the user interacts. These can include:
aria-pressedaria-expandedaria-validaria-liveregion content
test('open account menu actions', async ({ page }) => {
    // get the button - checking the attribute is set to false
    const logInButton = page.getByRole('button', {name: 'login', expanded: false});
    await logInButton.press('Enter');

    const accountMenu = page.locator('#account-menu');
    const accountMenuClose = page.locator('#account-menu-close')

    // check menu is visible
    await expect.soft(accountMenu).toBeVisible();
    // check button aria attribute has updated
    await expect.soft(logInButton.toHaveAttribute('aria-expanded','true'));
    // check close button in dialog is focused
    await expect.soft(accountMenuClose).toBeFocused();
});
Automating screen-readers
How about automating screen-readers directly? Well this can be done but as you will need a screen-reader installed it is unlikely something which would be achievable on a CI server.
There is a library called Guidepup which presents a bridge between Playwright and two screen-readers (NVDA and Voiceover).
I found that there were issues in getting the tests to run quickly and reliably, but it is certainly an area which is interesting and would be ideal for TDD.
// using Playwright and Guidepup with Voiceover
test("I can navigate the tables page", async ({ page, voiceOver }) => {

    await page.goto("http://liptrot.org/guides/vo-macos/tables/", {
      waitUntil: "domcontentloaded",
    });

    const header = await page.locator('header');
    await expect(header).toBeVisible();
    // start interacting with the page
    await voiceOver.interact();
    // jump to the next table (equivalent to VO + t command)
    await voiceOver.perform(voiceOver.keyboardCommands.findNextTable);
    await delay(1000);
    // next table
    await voiceOver.perform(voiceOver.keyboardCommands.findNextTable);
    // grab the last spoken announcement from VO
    const tableAnnouncement = await voiceOver.lastSpokenPhrase();
    // assert it contains the table caption
    expect(tableAnnouncement).toContain('Dates and amounts')
  });
Automating virtual screen-readers
An alternative to using real screen-readers is using a set of rules which follows how you would expect a screen-reader to act, by the specifications. For example, if you jump to an input you would expect the input's accessible name (eg the label) and accessible description to be announced.
This has the advantage of not being reliant on a screen-reader being installed and so can be run on a CI server.
// using Jest and Guidepup
test("should navigate to the input and announce the label and hint", async () => {
    document.body.innerHTML = `
    <form>
        <label for="ref">What is your reference?</label>
        <div class="hint" id="ref-hint">This is 10 characters.</div>
        <input type="text" name="ref" id="ref" aria-describedby="ref-hint" />
        <button>Save</button>
    </form>
    `;

    await virtual.start({ container: document.body });

    // Move to form
    await virtual.perform(virtual.commands.moveToNextForm);
    // Move to the input
    await virtual.next();
    await virtual.next();
    await virtual.next();
    // grab the last spoken announcement
    const lastSpokenPhrase = await virtual.lastSpokenPhrase();
    // check it contains the accessible name expected ...
    expect(lastSpokenPhrase).toContain("What is your reference?");
    // ... and the accessible description expected
    expect(lastSpokenPhrase).toContain("This is 10 characters");

    await virtual.stop();
});
Whilst this follows what the specifications say should happen, if you have done any screen-reader testing yourself you will know that screen-reader support often lags behind the specs, or screen-readers diverge from the specs to improve usability for their users.
For example with NVDA, moving through the content it will not announce the hint as above to avoid repetition, but if you jump directly to the input it will (as you have not already heard it).
So as with all our automated tests, this is another tool, but must not replace testing with actual screen-readers.
Incorporating automated testing into a workflow
Automated tests at their most basic out-of-the-box are relatively simple to introduce into an existing workflow and can be supplemented with some more thoughtful managed test scripts and practices:
- use browser plugins to check HTML prototypes for potential issues before writing the development team ticket, use the output to prompt questions
- use TDD to enforce accessibility best practice
- encourage the use of linters added to code editors to catch issues as the code is written
- run a browser plugin against any work which touches the user interface before the code is committed
- encourage code reviews to run browser plugins against pull requests
- add automated checks to unit tests and journey tests
- enhance journey tests with accessibility-focussed checks customised to the interface
Each of these can be written into a definition of ready or definition of done to help embed the practice.
Read more about team processes and testing strategies.
As with any kind of test, accessibility tests are only effective if the output is monitored, reviewed and acted upon. There is no point adding automated checks to a pipeline if no-one ever looks at the results of each run.
Wrap up
There are a lot of options we can employ when looking at improving automated accessibility testing, using out-of-the-box solutions is only the first step.
By considering all our users we can put in additional tests to improve the accessibility of our codebase.
Accessibility testing must not stop at automation, no matter how sophisticated it is. Manual testing is essential, but what automation testing does give us is a baseline. This baseline means that manual testing should be more effective and less time-consuming and noisy as a result.